
问题:
今天同事问我一个问题:Springboot 能否指定加载不同文件夹里的配置文件?
原本的样子:
根据他的意思是想要变成以下的样子:

- 多个相同名字的配置在不同的文件夹。
- 项目启动扫描指定文件夹下面的配置文件。
带着这个问题我去查阅了一番Spring的官网配置文档,得到如下参数:
相关参数:
Spring.config.additional-location:添加配置的扫描路径,注意如果同名在resources的配置文件会优先加载
Spring.config.localtion:这个配置会替换默认的扫描路径,建议使用上面的配置
使用方式:
启动的时候添加参数:-Dspring.config.additional-location=classpath:/test1/ 即可,当然你也可以换成绝对路径。
本着探究真理的准则,接下来debug一下源码,看看是如何运作的。
源码分析:
1.SpringBoot启动类
这里是Springboot启动的入口。
//<1> 开启自动装配
@SpringBootApplication
public class SpringbootApplication {
    public static void main(String[] args) {
        //<2> 调用 SpringApplication#run() 方法启动Spring Boot 应用
        SpringApplication.run(SpringbootApplication.class, args);
    }
}

//在上面代码中的 `<2>` 调用`SpringApplication#run`方法来启动 Spring Boot应用,就从这分析整个Spring Boot的启动过程

//org.springframework.boot.SpringApplication中的静态方法
public static ConfigurableApplicationContext run(Class<?> primarySource, String... args) {
        return run(new Class[]{primarySource}, args);
    }
public static ConfigurableApplicationContext run(Class<?>[] primarySources, String[] args) {
        return (new SpringApplication(primarySources)).run(args);
    }
- 可以看到最终创建一个
SpringApplication对象。 进行初始化SpringApplication - 初始化完毕后开始调用
run方法,运行spring应用
2.初始化 SpringApplication
/**
 * 资源加载器
 */
private ResourceLoader resourceLoader;
/**
 * 主要的 Java Config 类的数组
 */
private Set<Class<?>> primarySources;
/**
 * Web 应用类型
 */
private WebApplicationType webApplicationType;

/**
 * ApplicationContextInitializer 数组
 */
private List<ApplicationContextInitializer<?>> initializers;
/**
 * ApplicationListener 数组
 */
private List<ApplicationListener<?>> listeners;

public SpringApplication(Class<?>... primarySources) {
        this((ResourceLoader)null, primarySources);
    }

public SpringApplication(ResourceLoader resourceLoader, Class<?>... primarySources) {
        //...省略
        //主要的 Java Config 类的数组。在文初提供的示例,就是 TestApplication 类。
        this.primarySources = new LinkedHashSet(Arrays.asList(primarySources));
        //调用 WebApplicationType#deduceFromClasspath() 方法,通过 classpath ,判断 Web 应用类型。             REACTIVE / SERVLET
        this.webApplicationType = WebApplicationType.deduceFromClasspath();
        //初始化 initializers 属性
                              this.setInitializers(this.getSpringFactoriesInstances(ApplicationContextInitializer.class));
        //初始化 listeners 属性
        this.setListeners(this.getSpringFactoriesInstances(ApplicationListener.class));
        this.mainApplicationClass = this.deduceMainApplicationClass();
    }
3.run( )方法
在上面初始化完SpringApplication实例后,调用此方法运行SpringBoot应用。
public ConfigurableApplicationContext run(String... args) {
    // <1> 创建 StopWatch 对象,并启动。StopWatch 主要用于简单统计 run 启动过程的时长。
		StopWatch stopWatch = new StopWatch();
		stopWatch.start();
		ConfigurableApplicationContext context = null;
		Collection<SpringBootExceptionReporter> exceptionReporters = new ArrayList<>();
    // <2> 配置 headless 属性
		configureHeadlessProperty();
    // <3> 获得 SpringApplicationRunListener 的数组,并启动监听
		SpringApplicationRunListeners listeners = getRunListeners(args);
		listeners.starting();
		try {
			ApplicationArguments applicationArguments = new DefaultApplicationArguments(args);
      // <4> 加载属性配置。执行完成后,所有的 environment 的属性都会加载进来,包括 application.properties 和外部的属性配置。
			ConfigurableEnvironment environment = prepareEnvironment(listeners, applicationArguments);
			configureIgnoreBeanInfo(environment);
      // <5> 打印 Spring Banner
			Banner printedBanner = printBanner(environment);
      // <6> 创建 Spring 容器。
			context = createApplicationContext();
      // <7> 异常报告器
			exceptionReporters = getSpringFactoriesInstances(SpringBootExceptionReporter.class,
					new Class[] { ConfigurableApplicationContext.class }, context);
      // <8> 主要是调用所有初始化类的 initialize 方法
			prepareContext(context, environment, listeners, applicationArguments, printedBanner);
      // <9> 初始化 Spring 容器。
			refreshContext(context);
      // <10> 执行 Spring 容器的初始化的后置逻辑。默认实现为空
			afterRefresh(context, applicationArguments);
       // <11> 停止 StopWatch 统计时长
			stopWatch.stop();
      // <12> 打印 Spring Boot 启动的时长日志。
			if (this.logStartupInfo) {
				new StartupInfoLogger(this.mainApplicationClass).logStarted(getApplicationLog(), stopWatch);
			}
      // <13> 通知 SpringApplicationRunListener 的数组,Spring 容器启动完成。
			listeners.started(context);
      // <14> 调用 ApplicationRunner 或者 CommandLineRunner 的运行方法。
			callRunners(context, applicationArguments);
		}
		catch (Throwable ex) {
      // <14.1> 如果发生异常,则进行处理,并抛出 IllegalStateException 异常
			handleRunFailure(context, ex, exceptionReporters, listeners);
			throw new IllegalStateException(ex);
		}

		try {
      // <15> 通知 SpringApplicationRunListener 的数组,Spring 容器运行中。
			listeners.running(context);
		}
		catch (Throwable ex) {
      // <15.1> 如果发生异常,则进行处理,并抛出 IllegalStateException 异常
			handleRunFailure(context, ex, exceptionReporters, null);
			throw new IllegalStateException(ex);
		}
		return context;
	}
这里只分析Springboot 如何通过Spring.config.additional-location和Spring.config.localtion这两个参数来加载指定文件夹下面的配置文件。所以这里只分析第三步和第四步。
3.1 getRunListeners( ) 方法
获得 SpringApplicationRunListener 的数组,并启动监听
private SpringApplicationRunListeners getRunListeners(String[] args) {
		Class<?>[] types = new Class<?>[] { SpringApplication.class, String[].class };
    //调用getSpringFactoriesInstances()方法
		return new SpringApplicationRunListeners(logger, getSpringFactoriesInstances(
				SpringApplicationRunListener.class, types, this, args));
	}


private <T> Collection<T> getSpringFactoriesInstances(Class<T> type,
			Class<?>[] parameterTypes, Object... args) {
		ClassLoader classLoader = getClassLoader();
		// Use names and ensure unique to protect against duplicates
		Set<String> names = new LinkedHashSet<>(
        //<1> 调用SpringFactoriesLoader.loadFactoryNames来加载listener
				SpringFactoriesLoader.loadFactoryNames(type, classLoader));
        //<2> 获取到listener的classname 之后 通过反射实例化
		List<T> instances = createSpringFactoriesInstances(type, parameterTypes,
				classLoader, args, names);
		AnnotationAwareOrderComparator.sort(instances);
		return instances;
	}
-
<1>调用SpringFactoriesLoader.loadFactoryNames来加载listener这个loadFactoryNames方法就是Springboot的
自动装配机制的具体实现。public static List<String> loadFactoryNames(Class<?> factoryClass, @Nullable ClassLoader classLoader) { String factoryClassName = factoryClass.getName(); return loadSpringFactories(classLoader).getOrDefault(factoryClassName, Collections.emptyList()); } private static Map<String, List<String>> loadSpringFactories(@Nullable ClassLoader classLoader) { MultiValueMap<String, String> result = cache.get(classLoader); if (result != null) { return result; } try { //<1> 获取 META-INF/spring.factories 文件,然后加载 SpringApplicationRunListener Enumeration<URL> urls = (classLoader != null ? classLoader.getResources(FACTORIES_RESOURCE_LOCATION) : ClassLoader.getSystemResources(FACTORIES_RESOURCE_LOCATION)); result = new LinkedMultiValueMap<>(); while (urls.hasMoreElements()) { URL url = urls.nextElement(); UrlResource resource = new UrlResource(url); Properties properties = PropertiesLoaderUtils.loadProperties(resource); for (Map.Entry<?, ?> entry : properties.entrySet()) { String factoryClassName = ((String) entry.getKey()).trim(); for (String factoryName : StringUtils.commaDelimitedListToStringArray((String) entry.getValue())) { result.add(factoryClassName, factoryName.trim()); } } } cache.put(classLoader, result); return result; } catch (IOException ex) { throw new IllegalArgumentException("Unable to load factories from location [" + FACTORIES_RESOURCE_LOCATION + "]", ex); } }loadSpringFactories方法中<1>中的常量,以及spring.factories文件
public static final String FACTORIES_RESOURCE_LOCATION = "META-INF/spring.factories";

# Run Listeners
org.springframework.boot.SpringApplicationRunListener=\
org.springframework.boot.context.event.EventPublishingRunListener
可以看到在这个
spring.factories文件中,SpringApplicationRunListener 对应的具体实现是EventPublishingRunListener类。
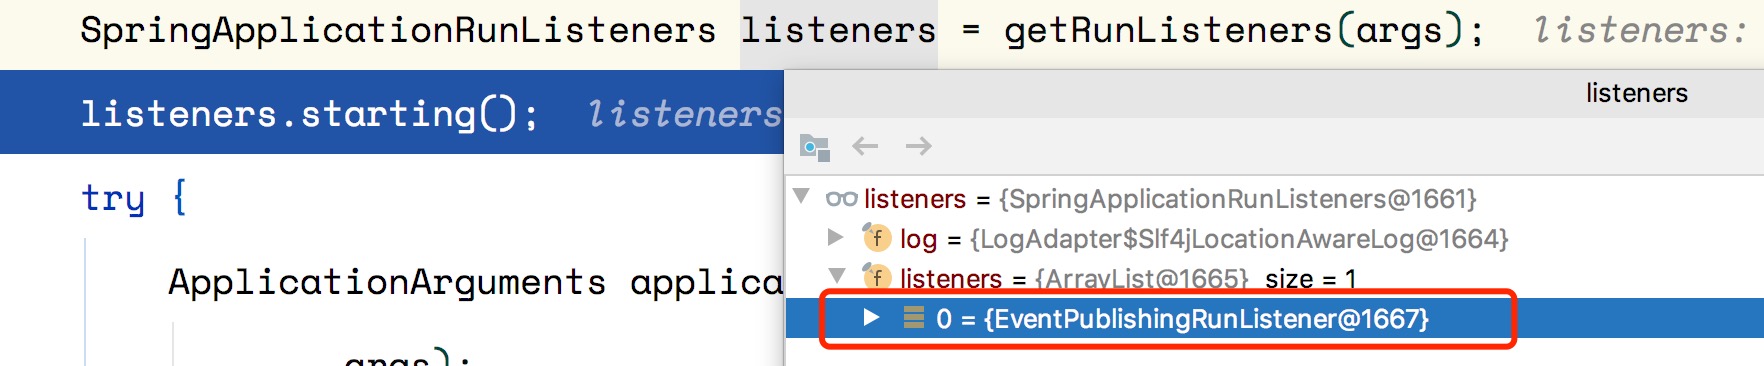
<2>获取到listener的classname 之后 通过反射实例化
3.2 prepareEnvironment( ) 方法
到此方法获取了EventPublishingRunListener类实例。然后通过 prepareEnvironment( ) 方法来加载配置文件。
private ConfigurableEnvironment prepareEnvironment(
			SpringApplicationRunListeners listeners,
			ApplicationArguments applicationArguments) {
		// Create and configure the environment
    //<1> 获取 ConfigurableEnvironment 如果存在直接返回,如果不存在就创建一个
		ConfigurableEnvironment environment = getOrCreateEnvironment();
    //<2> 对environment进行配置
		configureEnvironment(environment, applicationArguments.getSourceArgs());
    //<3> 通知 SpringApplicationRunListener 的数组,环境变量已经准备完成。
		listeners.environmentPrepared(environment);
    //<4> 把配置文件与当前的application 进行绑定
		bindToSpringApplication(environment);
		if (!this.isCustomEnvironment) {
			environment = new EnvironmentConverter(getClassLoader())
					.convertEnvironmentIfNecessary(environment, deduceEnvironmentClass());
		}
		ConfigurationPropertySources.attach(environment);
		return environment;
	}
-
<1>获取 ConfigurableEnvironment 如果存在直接返回,如果不存在就创建一个 -
<2>对environment进行配置protected void configureEnvironment(ConfigurableEnvironment environment, String[] args) { // <2.1> 设置 environment 的 conversionService 属性 if (this.addConversionService) { ConversionService conversionService = ApplicationConversionService.getSharedInstance(); environment.setConversionService((ConfigurableConversionService) conversionService); } // <2.2> 增加 environment 的 PropertySource 属性源 configurePropertySources(environment, args); // <2.3> 配置 environment 的 activeProfiles 属性 configureProfiles(environment, args); }-
<2.2>增加 environment 的 PropertySource 属性源protected void configurePropertySources(ConfigurableEnvironment environment, String[] args) { MutablePropertySources sources = environment.getPropertySources(); // 配置的 defaultProperties if (this.defaultProperties != null && !this.defaultProperties.isEmpty()) { sources.addLast(new MapPropertySource("defaultProperties", this.defaultProperties)); } // 来自启动参数的 if (this.addCommandLineProperties && args.length > 0) { String name = CommandLinePropertySource.COMMAND_LINE_PROPERTY_SOURCE_NAME; if (sources.contains(name)) {// 已存在,就进行替换 PropertySource<?> source = sources.get(name); CompositePropertySource composite = new CompositePropertySource(name); composite.addPropertySource( new SimpleCommandLinePropertySource("springApplicationCommandLineArgs", args)); composite.addPropertySource(source); sources.replace(name, composite); } else {// 不存在,就进行添加 sources.addFirst(new SimpleCommandLinePropertySource(args)); } } } -
<2.3>配置 environment 的 activeProfiles 属性protected void configureProfiles(ConfigurableEnvironment environment, String[] args) { Set<String> profiles = new LinkedHashSet<>(this.additionalProfiles); profiles.addAll(Arrays.asList(environment.getActiveProfiles())); // 设置 activeProfiles environment.setActiveProfiles(StringUtils.toStringArray(profiles)); }
-
-
<3>重点方法:通知 SpringApplicationRunListener 的数组,环境变量已经准备完成。这里会调用
listener#environmentPrepared方法,根据3.1的getRunListeners()方法得知,这里只有一个EventPublishingRunListener监听器//org.springframework.boot.context.event.EventPublishingRunListener /** * 事件广播器 */ private final SimpleApplicationEventMulticaster initialMulticaster; public void environmentPrepared(ConfigurableEnvironment environment) { this.initialMulticaster .multicastEvent(new ApplicationEnvironmentPreparedEvent(this.application, this.args, environment)); } //org.springframework.context.event.SimpleApplicationEventMulticaster public void multicastEvent(final ApplicationEvent event, @Nullable ResolvableType eventType) { ResolvableType type = (eventType != null ? eventType : resolveDefaultEventType(event)); Executor executor = getTaskExecutor(); //<1> 获取监听器 for (ApplicationListener<?> listener : getApplicationListeners(event, type)) { if (executor != null) { executor.execute(() -> invokeListener(listener, event)); } else { //<2> 依次执行 invokeListener(listener, event); } } }-
在这里this.initialMulticaster 指的是SimpleApplicationEventMulticaster 事件传播器
-
调用
SimpleApplicationEventMulticaster#multicastEvent()事件进行传播出去 -
<1>获取所有的监听器,具体流程是根据类型选出具体的listener 依次执行,可以查看retrieveApplicationListeners方法# Application Listeners org.springframework.context.ApplicationListener=\ org.springframework.boot.ClearCachesApplicationListener,\ org.springframework.boot.builder.ParentContextCloserApplicationListener,\ org.springframework.boot.cloud.CloudFoundryVcapEnvironmentPostProcessor,\ org.springframework.boot.context.FileEncodingApplicationListener,\ org.springframework.boot.context.config.AnsiOutputApplicationListener,\ org.springframework.boot.context.config.ConfigFileApplicationListener,\ org.springframework.boot.context.config.DelegatingApplicationListener,\ org.springframework.boot.context.logging.ClasspathLoggingApplicationListener,\ org.springframework.boot.context.logging.LoggingApplicationListener,\ org.springframework.boot.liquibase.LiquibaseServiceLocatorApplicationListener -
<2>依次执行这些处理器protected void invokeListener(ApplicationListener<?> listener, ApplicationEvent event) { ErrorHandler errorHandler = getErrorHandler(); if (errorHandler != null) { try { doInvokeListener(listener, event); } catch (Throwable err) { errorHandler.handleError(err); } } else { doInvokeListener(listener, event); } } private void doInvokeListener(ApplicationListener listener, ApplicationEvent event) { try { //是一个接口,具体的实现 listener.onApplicationEvent(event); } catch (ClassCastException ex) { String msg = ex.getMessage(); if (msg == null || matchesClassCastMessage(msg, event.getClass())) { // Possibly a lambda-defined listener which we could not resolve the generic event type for // -> let's suppress the exception and just log a debug message. Log logger = LogFactory.getLog(getClass()); if (logger.isTraceEnabled()) { logger.trace("Non-matching event type for listener: " + listener, ex); } } else { throw ex; } } }在getApplicationListeners 方法获取监听器后,然后进行调用。由于今天是加载指定目录下的配置文件,那么我们重点看一下
ConfigFileApplicationListener这个监听器的onApplicationEvent方法//org.springframework.boot.context.config.ConfigFileApplicationListener public void onApplicationEvent(ApplicationEvent event) { //由于是加载配置文件 所以这里会走onApplicationEnvironmentPreparedEvent方法 if (event instanceof ApplicationEnvironmentPreparedEvent) { onApplicationEnvironmentPreparedEvent( (ApplicationEnvironmentPreparedEvent) event); } if (event instanceof ApplicationPreparedEvent) { onApplicationPreparedEvent(event); } } private void onApplicationEnvironmentPreparedEvent( ApplicationEnvironmentPreparedEvent event) { //<1> 通过自配装配 获取所有的Processors List<EnvironmentPostProcessor> postProcessors = loadPostProcessors(); //添加自己 postProcessors.add(this); //排序 AnnotationAwareOrderComparator.sort(postProcessors); for (EnvironmentPostProcessor postProcessor : postProcessors) { //<2> 依次执行 postProcessor.postProcessEnvironment(event.getEnvironment(), event.getSpringApplication()); } }-
<1>通过自配配置 获取所有的ProcessorsList<EnvironmentPostProcessor> loadPostProcessors() { return SpringFactoriesLoader.loadFactories(EnvironmentPostProcessor.class, getClass().getClassLoader()); }# Environment Post Processors org.springframework.boot.env.EnvironmentPostProcessor=\ org.springframework.boot.cloud.CloudFoundryVcapEnvironmentPostProcessor,\ org.springframework.boot.env.SpringApplicationJsonEnvironmentPostProcessor,\ org.springframework.boot.env.SystemEnvironmentPropertySourceEnvironmentPostProcessor,\ org.springframework.boot.reactor.DebugAgentEnvironmentPostProcessor可以看到getApplicationListeners 方法只获取到了三个处理器,
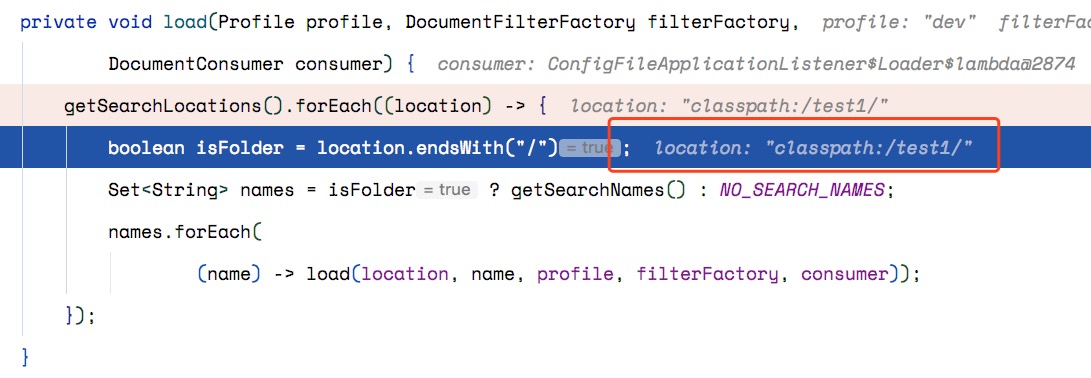
DebugAgentEnvironmentPostProcessor这个Processor 没有加载,因为这个Processor 只有在Web Type 是Reactor 的时候才能被加载。<2>当准备好Processor 之后,依次执行他们的postProcessEnvironment方法,每个Processor 处理不同的配置文件,这里我们找到ConfigFileApplicationListener 他是处理指定位置的配置文件,如下图:与我加的参数一模一样,到这里就真相大白了。-Dspring.config.additional-location=classpath:/test1/
-
-
这边文章是分析Springboot如何加载指定位置的配置文件:具体来说通过自动装配,加载监听器和处理器,监听器监听EnvironmentEvent 事件,然后传给具体的处理器来进行处理。ConfigFileApplicationListener是来加载指定位置的配置文件的处理器。